One Pan Honey Garlic Chicken Simple and Flavorful Recipe

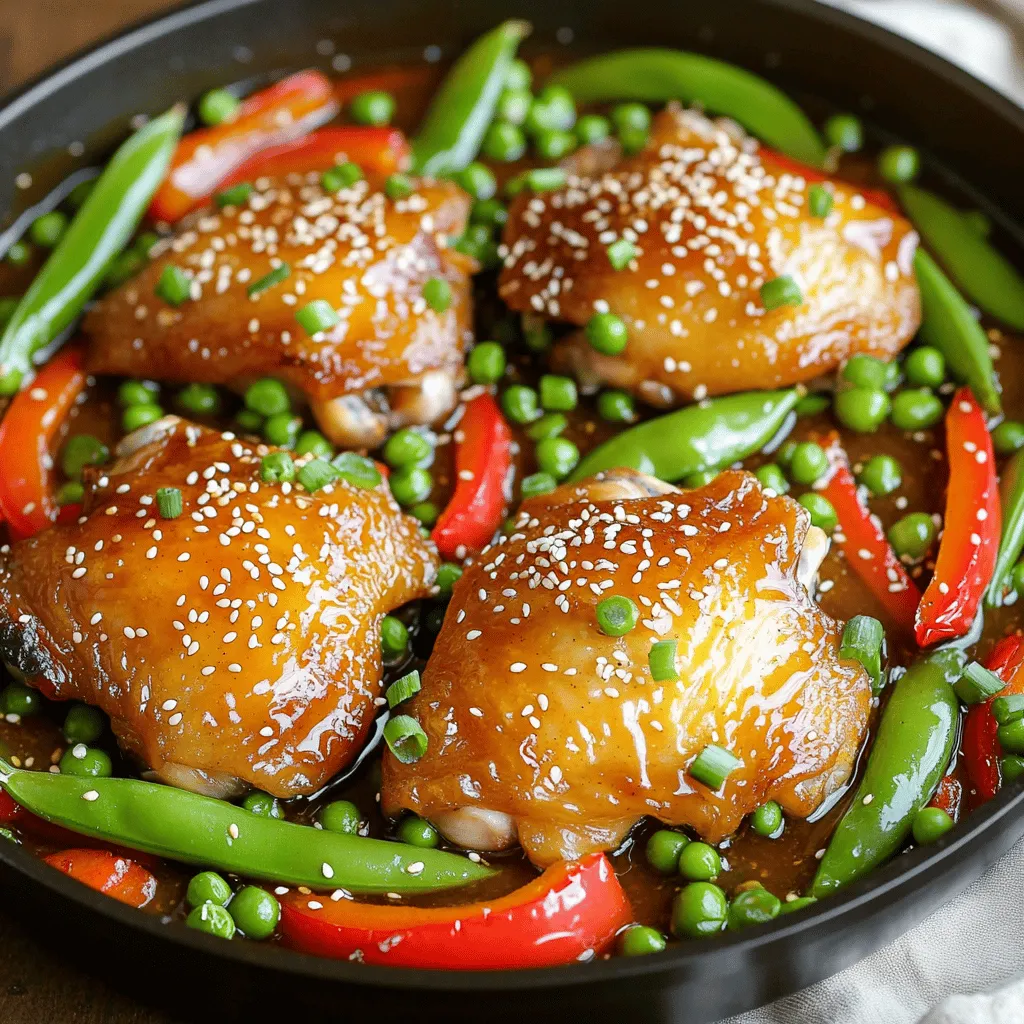
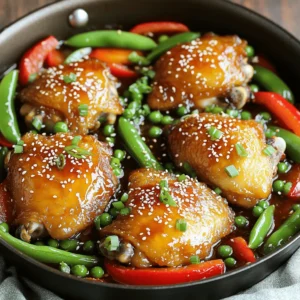
Looking for a dinner that’s easy, tasty, and uses just one pan? You’ve come to the right place! This One Pan Honey Garlic Chicken recipe is packed with flavor, thanks to simple ingredients like honey, garlic, and soy sauce. In just a few steps, you’ll create a dish that’s perfect for busy nights. Stick around, and I’ll guide you through making this simple yet delicious meal!
Ingredients
Detailed Ingredient List
– Bone-in, skin-on chicken thighs: These thighs stay juicy and flavorful during cooking. The skin crisps up nicely, adding texture.
– Honey: This adds a sweet touch that balances the savory notes. Honey helps the sauce stick to the chicken.
– Garlic: Fresh garlic gives a strong, aromatic flavor that pairs well with the sweetness of honey.
– Soy sauce: This adds umami and depth to the dish, enhancing the overall flavor.
Optional Ingredients for Enhanced Flavor
– Fresh ginger: Adding ginger gives a warm, spicy kick to the dish. It also helps with digestion.
– Alternative vegetables: Try using broccoli, carrots, or zucchini. These can add different textures and flavors, making your dish more colorful and fun.
Step-by-Step Instructions
Preparation Steps
1. Preheat Your Oven: Start by preheating your oven to 400°F (200°C). This step is key because it ensures the chicken cooks evenly. A hot oven helps the skin get crispy and golden.
2. Mix the Sauce: In a small bowl, combine the honey, minced garlic, soy sauce, apple cider vinegar, and grated ginger. Whisk these ingredients until smooth. Set this honey garlic sauce aside for later. It will add great flavor to your chicken.
Cooking Process
1. Sear the Chicken: Grab a large, oven-safe skillet and place it on the stove over medium-high heat. Add the olive oil and let it warm. Season both sides of the chicken thighs with salt and pepper. Carefully place the chicken in the skillet, skin-side down. Sear for about 5-7 minutes. Look for a nice golden brown color on the skin.
2. Add the Sauce: Flip the chicken thighs over so the skin is facing up. Pour the honey garlic mixture over the chicken. Make sure each piece gets a good coating of that tasty sauce.
Final Cooking and Garnishing
1. Roast in the Oven: Carefully transfer the skillet to your preheated oven. Roast for about 25-30 minutes. Check that the chicken reaches an internal temperature of 165°F (75°C). The juices should run clear when it is done.
2. Rest and Prepare to Garnish: After cooking, remove the skillet from the oven. Let the chicken rest for about 5 minutes. This step ensures the chicken stays juicy and tender.
3. Final Touches: Just before serving, garnish the dish with chopped green onions and a sprinkle of sesame seeds. This adds a nice crunch and makes your dish look beautiful.
Enjoy this simple and flavorful One Pan Honey Garlic Chicken! For the full recipe, check the complete guide above.
Tips & Tricks
Practical Cooking Tips
To get crispy chicken skin, follow these steps:
– Dry the Skin: Pat the chicken dry with paper towels. Moisture makes the skin soggy.
– High Heat Sear: Sear the chicken skin-side down on medium-high heat. This helps it brown fast.
– Don’t Crowd the Pan: Give the chicken space. Overcrowding lowers the pan’s heat and prevents crisping.
When adjusting flavors, find the right balance between sweet and savory. Honey brings sweetness, while soy sauce adds saltiness.
– Taste as You Go: Before adding too much honey or soy sauce, taste the sauce. Adjust based on your preference.
– Add Fresh Ingredients: Fresh ginger can enhance the flavor. A touch of acidity from vinegar brightens the dish.
Serving Suggestions
One Pan Honey Garlic Chicken pairs well with several sides:
– Rice: Steamed white or brown rice absorbs the sauce nicely.
– Salad: A fresh green salad adds crunch and color to your plate.
– Roasted Vegetables: Extra roasted veggies can complement the meal and add nutrition.
For presentation, consider these tips:
– Use a Large Platter: Transfer the chicken and veggies to a big dish for a family-style feel.
– Garnish: Scatter chopped green onions and sesame seeds on top. This makes the dish look vibrant and inviting.
Explore the Full Recipe to make this dish shine at your next dinner!
Variations
Ingredient Swaps
You can swap bone-in chicken thighs for boneless chicken. Boneless thighs cook faster and stay juicy. You can also use chicken breasts if you prefer. Just make sure to monitor the cooking time.
For vegetables, consider using broccoli or carrots. Both add great color and nutrients. You can even toss in zucchini or asparagus for a fresh taste. Feel free to mix and match based on what you have.
Flavor Enhancements
Want a twist? Try adding spices like paprika or cayenne pepper. This adds warmth without overpowering the honey flavor. Fresh herbs like thyme or rosemary can also brighten up the dish.
If you like things sweeter, add more honey. For a tangy kick, increase the apple cider vinegar. Adjust the sweetness to your liking to make it just right.
Storage Info
Storing Leftovers
After you finish your One Pan Honey Garlic Chicken, let it cool down. Cooling is key. You want to avoid steam, which can make your chicken soggy. Place the chicken in an air-tight container. This keeps it fresh and safe. If you don’t have an air-tight container, use plastic wrap or aluminum foil. Make sure it is tightly sealed. Store it in the fridge for up to four days.
Reheating Tips
When you reheat chicken, you want to keep it tasty. The best way is to use the oven. Preheat your oven to 350°F (175°C). Place the chicken on a baking tray. Cover it with foil to keep it moist. Heat for about 15-20 minutes. If you want to use a microwave, place the chicken in a microwave-safe dish. Add a splash of water to keep it juicy. Heat it for 1-2 minutes, checking every 30 seconds. Remember, you want to keep the chicken tender and flavorful.
FAQs
Common Questions
Can I make One Pan Honey Garlic Chicken ahead of time?
Yes, you can make this dish ahead of time. Cook the chicken and veggies as usual. Allow them to cool, then store in the fridge. When ready to eat, simply reheat in the oven or microwave. The flavors will still be great!
What do I do if my chicken isn’t cooking evenly?
If your chicken isn’t cooking evenly, check your pan size. A pan that is too small can cause uneven cooking. Make sure the chicken pieces are not crowded. You can also rotate the pan halfway through cooking for even heat.
Troubleshooting
How to fix sauce that is too thick or too thin
If your sauce is too thick, add a splash of water or chicken broth. Stir well to combine. If it’s too thin, let it simmer on low heat until it thickens. You can also mix in a cornstarch slurry to help achieve the right consistency.
Substitutions if I run out of an ingredient
If you run out of honey, maple syrup works well. For soy sauce, try tamari or coconut aminos. If you don’t have snap peas, use green beans or broccoli. Be creative!
To sum up, this guide covers all you need for perfect One Pan Honey Garlic Chicken. We explored key ingredients like chicken thighs, honey, garlic, and soy sauce for rich flavor. I shared step-by-step instructions, tips for crispy skin, and serving ideas. Don’t forget to experiment with variations and proper storage techniques. This dish is not only delicious but also easy to adapt to your taste. With these tips, you’ll impress everyone at your next meal. Enjoy making this simple yet satisfying recipe!
![To make creamy garlic mashed potatoes, you'll need some simple and fresh ingredients. Here’s what you should gather: - 2 lbs Yukon Gold potatoes, peeled and quartered - 4 cloves fresh garlic, finely minced - 1/2 cup cream cheese, softened - 1/2 cup milk (dairy or plant-based) - 1/4 cup unsalted butter - Salt and black pepper, to taste - Fresh chives or parsley, for garnish These ingredients create a rich and flavorful dish that brings comfort to any meal. Yukon Gold potatoes work best due to their creamy texture and buttery flavor. The fresh garlic adds a nice kick, while the cream cheese and butter ensure each bite is smooth and rich. Feel free to customize the milk type to fit your dietary needs. You can use almond, oat, or soy milk if you prefer a plant-based option. The fresh herbs at the end give your dish a lovely pop of color and taste. For the full recipe, you can check the complete instructions for making this delightful dish. To start, fill a large pot with water. Add a generous amount of salt. Bring the water to a rolling boil. Once boiling, add the quartered Yukon Gold potatoes. Cook them for about 15-20 minutes. You want them to be tender and soft. You can check if they are ready by piercing them with a fork. They should fall apart easily. While your potatoes cook, grab a small saucepan. Melt the unsalted butter over medium heat. Once melted, add the finely minced garlic. Sauté it for 1-2 minutes. Stir often to keep the garlic from browning. You want it to be fragrant and soft. This step adds a rich flavor to your mashed potatoes. After cooking, drain the potatoes in a colander. Return them to the pot you used to cook them. Now, add the softened cream cheese and your choice of milk. Pour in the sautéed garlic and melted butter. Season with salt and freshly cracked black pepper. Use a potato masher or an electric hand mixer. Mash the potatoes until they are creamy. If they feel too thick, slowly add a bit more milk. Taste your mashed potatoes and adjust salt or pepper as needed. Finally, transfer them to a serving bowl. Garnish with fresh chives or parsley for a pop of color. For the complete recipe, check out the [Full Recipe]. To get the best texture, adjust the milk. Start with a half cup and add more if needed. For creaminess, I often use a potato masher. It gives a nice, rustic feel. If you want it smoother, an electric mixer works well too. Just be careful not to overmix; it can make the potatoes gummy. Salt and pepper are key. Start with a pinch of each. Taste as you go to find your balance. You can also try adding garlic powder for a bolder garlic taste. If you love herbs, fresh thyme or rosemary can add a nice twist. Serve these mashed potatoes in a lovely bowl. A slight swirl on top makes them look fancy. You can place a pat of butter in the center. It melts beautifully and looks great. For a pop of color, sprinkle fresh chives or parsley on top. A light dusting of paprika adds both color and warmth. Enjoy your creamy garlic mashed potatoes! For the full recipe, check out the detailed instructions above. {{image_4}} To make your creamy garlic mashed potatoes dairy-free, you can swap out the cream cheese and milk. Use a plant-based cream cheese, like cashew or almond-based options, for a rich texture. For milk, almond milk or oat milk works well. These choices keep your dish creamy without dairy. I recommend using unsweetened versions to avoid unwanted flavors. For butter, try a plant-based butter. Look for brands that mimic the taste of regular butter. This way, you maintain that rich, buttery flavor in your mashed potatoes without dairy. Want to amp up the flavor? Adding roasted garlic gives your dish a deeper taste. Roasting garlic mellows its sharpness and adds a sweet note. Simply wrap whole garlic cloves in foil and bake until soft. Then mash it into your potatoes for a new twist. You can also incorporate herbs or spices for extra depth. Fresh rosemary or thyme can add a lovely aroma. A pinch of smoked paprika can enhance the flavor profile, giving a subtle smoky touch. Experiment with what you love to find your perfect mix. For an exciting twist, mix in cheese varieties. Parmesan adds a nutty flavor that pairs perfectly with garlic. Grate it fresh for the best taste. You might also try crumbled feta for a tangy kick. Adding sautéed vegetables is another way to boost color and nutrition. Think about mixing in cooked spinach, roasted red peppers, or sautéed mushrooms. These add texture and vibrant colors to your dish. Plus, they make your garlic mashed potatoes even more delicious. For the full recipe, check out the complete guide to making these comforting mashed potatoes! To store leftover mashed potatoes, let them cool first. Place them in an airtight container. This keeps them fresh and prevents drying out. Use a glass or plastic container with a tight lid. Label the container with the date for easy tracking. Consume within three to five days for the best flavor. Reheat mashed potatoes on the stove for the best texture. Add a splash of milk while warming. Stir gently over low heat to keep them creamy. You can also use the microwave, but do it in short bursts. Check every 30 seconds to prevent drying out. After reheating, taste and adjust seasonings. You might need more salt or pepper. To freeze mashed potatoes, let them cool completely. Scoop them into freezer-safe bags. Squeeze out as much air as possible before sealing. Label the bags with the date. They can last up to three months in the freezer. To thaw, place them in the fridge overnight. Reheat gently, adding milk for creaminess. Yukon Gold potatoes are the best choice for creamy mashed potatoes. They have a smooth texture and a rich flavor. Other types, like Russets, can fall apart and become dry. Yukon Golds hold moisture well, making them perfect for mashing. Their golden hue also adds a nice color to your dish. Yes, you can prepare them in advance. Cook and mash the potatoes, then store them in the fridge. Use an airtight container to keep them fresh. Reheating is simple; add a splash of milk to restore creaminess. Heat them gently on the stove or in the microwave for best results. To enhance creaminess, consider adding more than just butter and milk. Try mixing in sour cream or yogurt for a tangy twist. Cream cheese is another great option for extra richness. You can also fold in some heavy cream for a truly luxurious texture. This blog post shared a simple recipe for creamy garlic mashed potatoes. We discussed the key ingredients, step-by-step cooking, and tips for texture and flavor. You learned about variations, dairy-free options, and how to store leftovers. Remember, you can adjust for your taste. Don't shy away from experimenting with flavors. With these guidelines, you can create a dish that's just right for you and your family. Enjoy making your creamy garlic mashed potatoes!](https://lushplate.com/wp-content/uploads/2025/06/44364506-f669-4518-a813-4f980650b078-768x768.webp)
![- 4 large russet potatoes - 1/2 cup unsalted butter - 1 cup sour cream - 1 cup shredded sharp cheddar cheese - 1/2 cup whole milk - 1/4 cup fresh chives - 1 teaspoon garlic powder - 1 teaspoon onion powder - Salt and freshly ground black pepper - 1/2 cup breadcrumbs (optional) - Extra shredded cheese for topping (optional) The key to a great cheesy mashed potato casserole starts with the right potatoes. I prefer russet potatoes for their fluffy texture. You want to peel and chop them into 1-inch cubes for even cooking. Next, unsalted butter adds rich flavor. I like to use room temperature butter for easy mixing. Sour cream brings a nice creaminess and tang. Make sure to choose full-fat for the best taste. Sharp cheddar cheese is a must for that cheesy goodness. You can add extra cheese on top for a delicious crust. Whole milk makes the mixture smooth. If you want a fresh touch, don’t skip the chives. Seasoning is key. Garlic powder and onion powder enhance the flavor. Adjust salt and pepper to your taste. If you want a crunchy topping, breadcrumbs are perfect. You can also add more cheese on top for extra indulgence. - Alternatives to russet potatoes: Yukon gold potatoes work well if you want a creamier texture. - Dairy-free options for sour cream and cheese: Use cashew cream or vegan sour cream. Nutritional yeast can replace cheese for a cheesy flavor. - Topping alternatives: Try crushed crackers or cornflake crumbs for a different crunch. For more detailed steps, check the Full Recipe. To start, you need 4 large russet potatoes. First, peel them and cut them into 1-inch cubes. Next, place the potato cubes in a large pot. Add enough salted water to cover them by 1 inch. Bring the water to a boil over medium-high heat. Cook the potatoes until they are fork-tender, which takes about 15-20 minutes. Once they are done, drain the potatoes well and return them to the pot. Now, we’ll create a creamy mixture. Add 1/2 cup of unsalted butter to the potatoes. Then, mix in 1 cup of sour cream, which gives it a rich flavor. Pour in 1/2 cup of warmed whole milk to make it smooth. Season the mixture with 1 teaspoon of garlic powder and 1 teaspoon of onion powder. Don’t forget to add salt and pepper to taste. Use a potato masher or a hand mixer to mash everything until it is creamy and smooth. Next, let’s make this dish cheesy! Carefully fold in 1 cup of shredded sharp cheddar cheese and 1/4 cup of finely chopped chives. These add great flavor and color. Preheat your oven to 375°F (190°C) while you prepare the casserole dish. Lightly grease a 9x13 inch dish with cooking spray or butter. Spoon the cheesy mashed potato mixture into the dish and spread it evenly. If you like a crunchy top, sprinkle 1/2 cup of breadcrumbs over the surface. For more cheesy goodness, add extra shredded cheese on top. Finally, place the casserole in the preheated oven. Bake it for 25-30 minutes or until the top turns golden brown and the edges bubble. Once baked, let it cool for about 5 minutes, and then enjoy your delicious cheesy mashed potato casserole! You can find the full recipe for detailed steps. To get that smooth and creamy texture in your cheesy mashed potato casserole, start with boiling your potatoes correctly. Cut the russet potatoes into 1-inch cubes. This size cooks evenly and quickly. Boil them in salted water for 15 to 20 minutes. You want them fork-tender but not mushy. After draining the potatoes, return them to the pot. This helps steam escape, which keeps them from being watery. Use a potato masher or hand mixer to mash them. I recommend mashing them while they are still hot. Adding room temperature ingredients, like butter and sour cream, helps blend smoothly. Cold ingredients can make the mash clumpy. Seasoning is key to a great cheesy mashed potato casserole. Start with salt and pepper, but feel free to adjust. Garlic powder and onion powder add depth. You can also mix in fresh herbs like rosemary or thyme for extra flavor. A pinch of paprika can add a nice kick too. Experiment with different spices. Fresh chives add a nice touch and enhance the visual appeal. You can also try adding a bit of cream cheese for richness. It makes the texture even creamier and adds a new flavor layer. When it comes to serving, presentation matters. Use a spatula to scoop neat squares from the casserole dish. This makes it look good on the plate. You can garnish with more chives on top for color. Pair your cheesy mashed potato casserole with a variety of main dishes. It goes well with roast chicken, grilled steak, or baked fish. A crisp side salad can balance the richness of the dish. For a comforting meal, serve with a hearty meatloaf or barbecue ribs. {{image_4}} You can play with cheese in this dish. Mixing in different types of cheese adds fun flavors. Try mozzarella for a stringy texture or gouda for a smoky kick. Adding cream cheese makes it rich and creamy. This small change can elevate the dish to new heights. Incorporating veggies makes it healthier and adds color. Spinach or broccoli can be mixed in before baking. They blend well with cheese and potatoes. You can also add cooked bacon or ham. These meats bring extra flavor and heartiness to the casserole. If you want a lighter option, consider lower-calorie substitutes. Use Greek yogurt instead of sour cream. You can swap butter with olive oil. For a vegan version, use plant-based cheese and nut milk. These options still give you that cheesy goodness without the guilt. Store leftover cheesy mashed potato casserole in a sealed container. This keeps it fresh. It lasts in the fridge for about three to four days. When ready to enjoy, simply reheat portions in the microwave or oven. To freeze the casserole, let it cool completely. Then, wrap it tightly in plastic wrap and place it in a freezer-safe bag. This method helps prevent freezer burn. The casserole can stay frozen for up to three months. When you're ready to eat, thaw it in the fridge overnight. Reheat in the oven at 350°F (175°C) until hot. Cover with foil to keep it moist and prevent drying. You can make this casserole ahead of time. Prepare it up to the baking step and store it in the fridge. This works well for busy days. When you’re ready to bake, just pop it in the oven. To reheat without losing quality, add a splash of milk before warming, and cover it to keep it creamy. Enjoy your tasty, cheesy dish any day! Yes, you can prepare the casserole a day before. Just follow these steps: - Cook the potatoes and mash them as usual. - Mix in all your ingredients, then spread in a greased dish. - Cover tightly with plastic wrap or foil. - Refrigerate until you're ready to bake. - Bake it the next day. You may need to add a few extra minutes to heat through. This casserole pairs well with many dishes. Here are some ideas: - Roasted chicken for a hearty meal. - Grilled steak adds a nice touch. - Steamed vegetables bring color and nutrition. - Salad for a fresh contrast to the creamy casserole. Leftovers can be fun! Here are some ideas to give them new life: - Make potato cakes: Form the leftovers into patties, then pan-fry until golden. - Stuff baked potatoes: Scoop out a baked potato and fill it with leftover casserole. - Casserole soup: Mix it with broth and heat for a creamy soup. For the complete recipe with all details, check the [Full Recipe]. In this post, I shared a delicious cheesy mashed potato casserole recipe. We covered essential ingredients for a creamy texture and flavorful taste. I also offered helpful tips on variations, storage, and serving suggestions. You can easily customize this dish to your liking or dietary needs. As you enjoy this recipe, remember that cooking is about creativity. So, feel free to experiment and make it your own! Happy cooking!](https://lushplate.com/wp-content/uploads/2025/06/56f0ec02-445d-440f-b816-e571a6cd94af-768x768.webp)
![- Firm tofu - Soy sauce and sesame oil - Seasonings and garnishes - 1 block (14 oz) firm tofu, well-pressed and drained - 3 tablespoons cornstarch - 2 tablespoons soy sauce (low-sodium preferred) - 1 tablespoon sesame oil - 1 tablespoon pure maple syrup - 1 teaspoon garlic powder - 1 teaspoon onion powder - ½ teaspoon red pepper flakes (optional for additional heat) - Salt and freshly cracked black pepper, to taste - 1 tablespoon olive oil (for preparing the baking sheet) - Fresh herbs (such as cilantro or sliced green onions) for garnishing - Red pepper flakes for heat - Variations in herbs for garnish When you gather these ingredients, ensure your tofu is firm. This gives the best texture. Soy sauce and sesame oil add depth and umami flavor. The seasonings, like garlic and onion powder, enhance the taste further. You can choose to add red pepper flakes if you like some heat. Fresh herbs at the end bring freshness and color. For the exact measurements, I always recommend weighing your ingredients. This helps in getting the best results every time. You can find the full recipe linked above to guide you through the process. 1. Preheat your oven to 400°F (200°C). This helps the tofu cook evenly. 2. Cut the pressed tofu into bite-sized cubes or triangles. This makes for a nice presentation. 1. In a medium bowl, mix soy sauce, sesame oil, maple syrup, garlic powder, onion powder, and red pepper flakes. A pinch of salt and pepper adds great flavor. 2. Carefully toss the tofu in the marinade. Make sure every piece is coated well. Let it sit for 15-20 minutes to soak in the flavors. 1. Sprinkle cornstarch over the marinated tofu. Toss gently until each piece is coated. This step is key for crispiness. 2. Line a baking sheet with parchment paper. Lightly oil it to keep the tofu from sticking. Arrange the tofu in a single layer. 3. Bake for 25-30 minutes. Flip the tofu halfway through. This ensures even cooking and gives you that crispy texture you want. For the full recipe, check out the details and enjoy the taste of this crispy baked tofu! To make your tofu extra crispy, start by pressing it well. This step removes excess water, allowing the tofu to absorb flavor and become crunchy. Use a tofu press or wrap the tofu in a clean towel and place a heavy object on top. Let it press for at least 15 minutes. Next, use cornstarch effectively. After marinating the tofu, sprinkle cornstarch over it. Toss the tofu gently until every piece is coated. Cornstarch creates a crispy outer layer during baking. It forms a nice crust that adds texture and crunch. Don't be afraid to experiment with different marinades. You can try adding ginger, lime juice, or even peanut butter. Each addition brings its own twist to the dish. A good marinade makes all the difference in taste. Consider additional seasoning ideas too. Try adding smoked paprika, cumin, or even nutritional yeast for a cheesy flavor. These seasonings can elevate your crispy baked tofu to a whole new level. Pair your crispy baked tofu with simple side dishes. Steamed vegetables, rice, or quinoa work well. These sides balance the meal and add nutrition. Get creative with how you serve crispy baked tofu. You can make a tofu salad, add it to tacos, or toss it in stir-fries. The options are endless! For an exciting touch, garnish with fresh herbs like cilantro or sliced green onions. This adds color and flavor to your dish. For the complete recipe, check out the full recipe. {{image_4}} You can change the taste of crispy baked tofu easily. For an Asian-style twist, use ginger or five-spice powder. These flavors add warmth and depth. You can mix them into the marinade. They will give your tofu a nice kick. If you prefer a Mediterranean twist, try herbs de Provence. This blend brings a fresh and fragrant taste. It works well with olive oil and lemon juice. You can use these herbs to replace your usual spices. This change makes the dish bright and lively. Crispy baked tofu is versatile. You can air fry it for a quick option. Air frying gives your tofu an extra crunch. Set your air fryer to 375°F (190°C). Cook for about 15-20 minutes, shaking the basket halfway through. Another method is stir-frying with baked tofu pieces. After baking, toss the tofu in a hot pan with vegetables. This adds more flavor and color. It also makes a complete meal that is both tasty and fun. Not all tofu is the same. Different types give different textures. Firm tofu is great for baking. It holds its shape well. For a creamier bite, you can use silken tofu. This type is softer and less dense. Just keep in mind that it won't get as crispy. Extra-firm tofu is also a good choice. It has a nice bite and crisps up lovely. You can experiment with all these types to find your favorite texture. For the full recipe, check out the [Full Recipe]. To keep your crispy baked tofu fresh, place it in an airtight container. This helps maintain flavor and texture. Make sure it cools completely before sealing. Store it in the fridge for up to three days. You can use glass or plastic containers. Glass is a great choice as it doesn’t absorb smells. To enjoy your crispy tofu again, reheating is key. The oven is best for keeping it crispy. Preheat your oven to 375°F (190°C). Spread the tofu on a baking sheet in a single layer. Heat for about 10 to 15 minutes. Flip the tofu halfway through for even warmth. If you use a microwave, the tofu may lose its crispiness. For quick reheating, try 30 seconds to 1 minute. Check it often to avoid soggy tofu. Yes, you can freeze crispy baked tofu! First, let it cool completely. Then, wrap it in plastic wrap or foil. Place it in a freezer-safe bag. This way, it stays fresh for up to three months. To prepare tofu for freezing, consider cutting it into smaller pieces. This helps it thaw faster when you are ready to use it. When you want to eat it, simply thaw it in the fridge overnight before reheating. Enjoy your crispy baked tofu again! For a detailed recipe, check the Full Recipe. To make tofu crispier, start with firm or extra-firm tofu. Press it well to remove water. The drier the tofu, the better. Coat it in cornstarch before baking. This gives a nice crunch. Bake at high heat, around 400°F (200°C). Flip the tofu halfway through for even crispiness. The best type of tofu for baking is firm or extra-firm tofu. Soft or silken tofu is too delicate for baking. Firm tofu holds its shape well. It absorbs flavors and gets crispy when cooked. Try using extra-firm tofu if you want even more texture. Yes, you can use other sauces. Tamari is a great gluten-free option. Coconut aminos offer a sweeter taste. You could also try teriyaki sauce for a bold flavor. Each sauce changes the taste, so feel free to experiment. Crispy baked tofu is healthy. Tofu is packed with protein and low in calories. It contains important minerals like calcium and iron. Baking instead of frying cuts down on added fats. This method keeps your meal light and nutritious. Enjoy it as part of a balanced diet. For the full recipe, see above. Crispy baked tofu offers a delicious and versatile way to enjoy this healthy ingredient. We covered its main ingredients, preparation steps, and tips for crispiness. You can customize the flavor and texture with various marinades or cooking methods. Storing leftovers correctly ensures you preserve both taste and quality. Remember, experimenting with spices and side dishes will enhance your meals. Try these techniques, and enjoy your crispy baked tofu in countless ways. Your kitchen adventure is just beginning!](https://lushplate.com/wp-content/uploads/2025/06/9b29d447-7bc8-4f67-8718-0083b46dee2f-768x768.webp)

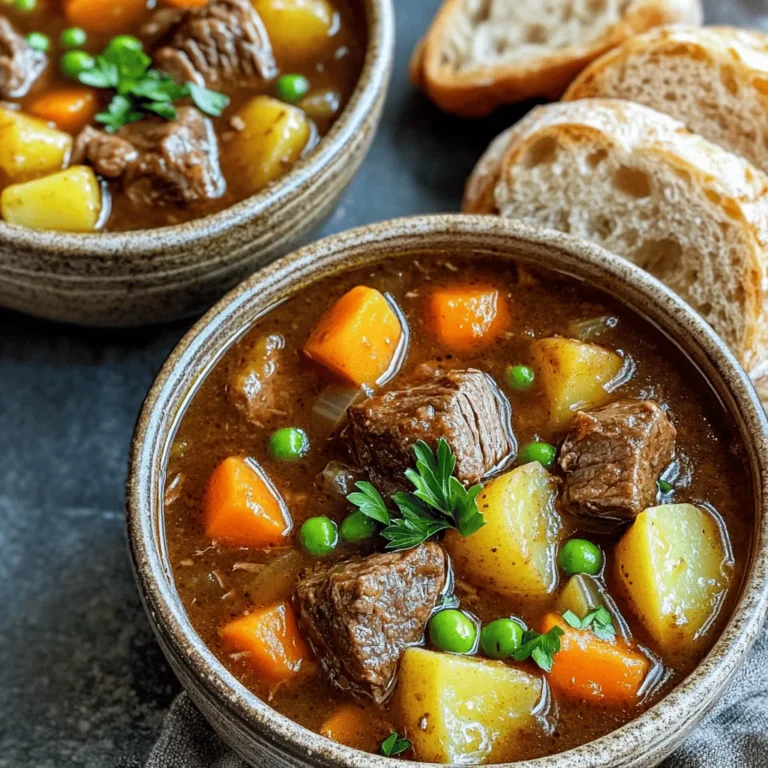
![To make this soup, you need simple, fresh ingredients. Here’s what you’ll need: - 1 lb boneless, skinless chicken breasts - 1 tablespoon olive oil - 1 medium onion, finely chopped - 2 cloves garlic, minced - 1 bell pepper, diced (choose red for sweetness or green for earthiness) - 1 can (14.5 oz) diced tomatoes with green chilies - 4 cups chicken broth (homemade or store-bought) - 1 can (15 oz) black beans, rinsed and drained - 1 cup corn (fresh, frozen, or canned) - 2 teaspoons ground cumin - 1 teaspoon chili powder - Salt and pepper to taste - Juice of 1 lime - Tortilla chips, for serving - Fresh cilantro, chopped, for garnish - Slices of avocado, for garnish Adding garnishes makes your soup shine! Here are some tasty options: - Crumbled queso fresco or feta cheese - Sour cream for creaminess - Extra lime wedges for a zesty kick - Sliced jalapeños for heat - Fresh radishes for crunch Choosing the best ingredients helps your soup taste great. Here’s how: - Chicken: Look for bright pink, firm chicken. Avoid any with a gray hue. - Vegetables: Pick firm bell peppers with shiny skin. They should feel heavy for their size. - Beans: Choose low-sodium canned black beans. Rinse them well to cut the salt. - Spices: Check expiration dates for freshness. Old spices lose flavor. Using fresh ingredients makes your Easy Chicken Tortilla Soup even better! For the complete recipe, check out the Full Recipe. Start by gathering all your ingredients. You need: - 1 lb boneless, skinless chicken breasts - 1 tablespoon olive oil - 1 medium onion, finely chopped - 2 cloves garlic, minced - 1 bell pepper, diced - 1 can (14.5 oz) diced tomatoes with green chilies - 4 cups chicken broth - 1 can (15 oz) black beans, rinsed and drained - 1 cup corn - 2 teaspoons ground cumin - 1 teaspoon chili powder - Salt and pepper to taste - Juice of 1 lime - Tortilla chips - Fresh cilantro, chopped - Slices of avocado Next, chop the onion, garlic, and bell pepper. This step makes cooking easier. Get everything ready before you start cooking. Heat the olive oil in a large pot over medium heat. Once the oil is hot, add the chopped onion. Sauté for about 3-4 minutes until the onion is soft. Then, add the minced garlic and diced bell pepper. Cook for another 2-3 minutes. Stir often to keep them from burning. Now, add the chicken breasts to the pot. Pour in the diced tomatoes, chicken broth, black beans, corn, ground cumin, and chili powder. Stir everything together. Increase the heat until the soup starts to boil. Then, reduce the heat to low. Let it simmer for 20-25 minutes until the chicken is cooked. After the chicken is cooked, take it out of the pot. Use two forks to shred the chicken into small pieces. Return the shredded chicken back into the soup. Now, season the soup with salt, pepper, and the juice of one lime. Taste it and adjust if needed. Let it simmer for another 5 minutes. This lets the flavors mix well. When ready to serve, ladle the soup into bowls. Top with crunchy tortilla chips, chopped cilantro, and creamy avocado slices. Enjoy your easy chicken tortilla soup! For more details, check the Full Recipe. To make your chicken tortilla soup burst with flavor, use fresh ingredients. Fresh herbs and spices add depth. For a kick, add lime juice at the end. This brightens the taste and balances the soup. Also, let your soup simmer. This helps the flavors blend well. Taste and adjust salt and spices as needed. Using homemade chicken broth enhances the taste even more. If you want a smoky flavor, try adding a bit of smoked paprika. One common mistake is overcooking the chicken. If you cook it too long, it will become dry. Always check for doneness around the 20-minute mark. Another mistake is not seasoning enough. Be generous with salt, pepper, and spices. Last, do not skip the toppings! They add texture and brightness to the dish. Tortilla chips, cilantro, and avocado make a big difference. You will need a large pot or Dutch oven for cooking the soup. A cutting board and sharp knife are essential for chopping ingredients. Use measuring spoons for spices to ensure the right flavors. A ladle helps you serve the soup easily. Finally, having a couple of forks handy will help you shred the chicken quickly. For more details on the full recipe, check out the [Full Recipe]. {{image_4}} You can make a tasty vegetarian version of this soup. Instead of chicken, use one cup of diced firm tofu or two cups of mushrooms. They add nice texture and flavor. You can also use extra beans, like pinto or kidney beans. This keeps the protein high and the soup filling. Don't forget to add more veggies like zucchini or carrots for a colorful twist. To adjust the heat, you can play with the spices. If you want a milder soup, skip the chili powder. Use only a pinch of ground cumin. For a hotter version, add extra chili powder or some diced jalapeños. You can also use hot sauce or a sprinkle of cayenne pepper. Always taste as you go to find the right balance for you. Canned goods are handy, but fresh ingredients can enhance flavor. Instead of canned tomatoes, try fresh diced tomatoes. Use homemade broth instead of store-bought for a richer taste. If you don't have canned corn, fresh or frozen corn works great. You can even skip the beans entirely and add more veggies instead. Each swap gives you a new twist on the classic recipe. For more details, check the Full Recipe. To keep your soup fresh, store it in an airtight container. Let it cool first. Place the container in the fridge. The soup lasts about three days. When you want to eat it again, check for any changes in smell or color. You can freeze the soup for longer storage. Use freezer-safe bags or containers. Leave some space for expansion. The soup stays good for about three months. Label it with the date and name for easy tracking. To reheat, you can use a pot on the stove. Heat it over low to medium heat. Stir often to avoid sticking. You can also use the microwave. Heat it in short bursts, stirring in between. Add fresh toppings like cilantro and avocado for extra flavor. Enjoy your warm bowl! Chicken Tortilla Soup comes from Mexico. Many say it began in Jalisco. It is a mix of flavors and textures. The soup uses local ingredients like chicken and corn. People often top it with crispy tortilla strips. This adds crunch and flavor. Each family has its own twist on the recipe. Yes, you can make this soup in a slow cooker. Just add all the ingredients and cook on low for 6-8 hours. For an Instant Pot, use the sauté function first. After that, cook on high pressure for about 15 minutes. Both methods yield tasty results. To make this soup gluten-free, choose gluten-free tortillas. Most corn tortillas are a safe option. Also, check canned goods for gluten-free labels. This ensures you avoid any hidden gluten. With these swaps, you can enjoy this soup safely. For the Full Recipe, follow the steps as usual! This blog covers how to make Easy Chicken Tortilla Soup. We explored key ingredients, cooking steps, and tips for great flavor. You learned about ingredient swaps and storing leftovers too. In summary, this soup is easy to make and fun to customize. I hope you feel ready to try it yourself. Enjoy your cooking adventure!](https://lushplate.com/wp-content/uploads/2025/05/229260f2-781c-40ff-80f9-6a0fbe411596-768x768.webp)