Peanut Butter Blossoms Delightful Cookie Recipe
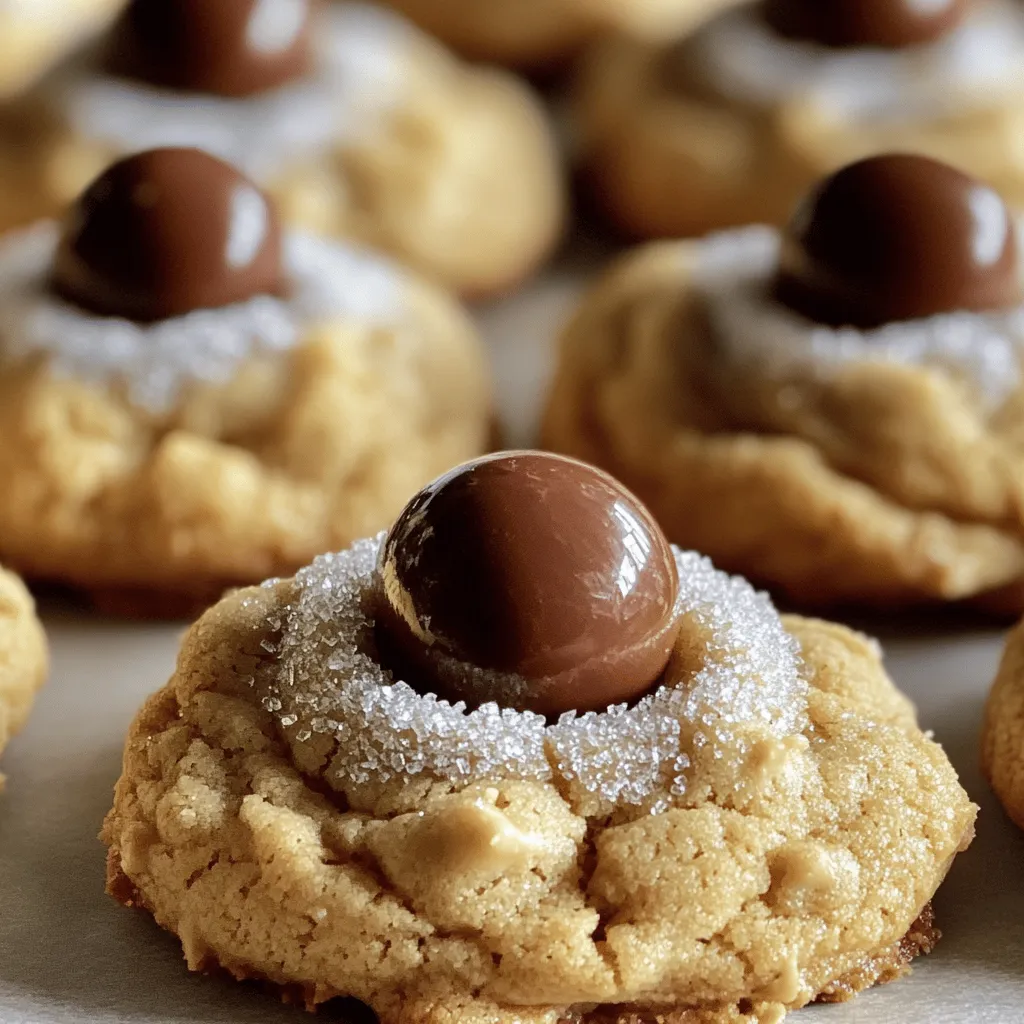
![Here is the detailed list of ingredients you will need for Peanut Butter Blossoms: - 1 cup creamy peanut butter - 1 cup granulated sugar - 1 cup packed light brown sugar - 1 large egg - 1 teaspoon pure vanilla extract - 1 teaspoon baking soda - ½ teaspoon fine salt - 1 ½ cups all-purpose flour - 36 unwrapped chocolate kisses - Additional granulated sugar for rolling Each ingredient plays a key role in making these cookies delightful. The creamy peanut butter gives them a rich, nutty taste. The granulated and brown sugars add sweetness and depth. The egg binds everything together while adding moisture. Pure vanilla extract brings in a warm, fragrant note. Baking soda helps create that lovely puffiness. Fine salt balances the sweetness, and all-purpose flour gives structure. Finally, the chocolate kisses provide a fun, melty surprise right in the middle of each cookie. Make sure to gather everything before you start. This way, you can enjoy the process and not rush! For the full recipe, check the details above. - Preheat Oven and Prepare Baking Sheet Start by preheating your oven to 350°F (175°C). This helps the cookies bake evenly. Next, line a baking sheet with parchment paper. This prevents sticking and makes cleanup easier. - Mix Peanut Butter and Sugars In a large mixing bowl, add the creamy peanut butter, granulated sugar, and brown sugar. Use a hand mixer or wooden spoon to mix until creamy. You want a smooth and blended texture. - Incorporate Egg and Other Ingredients Crack a large egg into the bowl. Then add the pure vanilla extract, baking soda, and fine salt. Stir these into the mixture until fully combined. Your batter should look uniform and slightly thick. - Gradually Add Flour Slowly add the all-purpose flour to the bowl. Mix it in a little at a time. This will help form a soft dough. It should feel a bit sticky but still manageable. - Roll Dough into Balls Take small portions of the dough and roll them into 1-inch balls. Make sure they are uniform in size. After shaping, roll each ball in granulated sugar. This adds sweetness and texture. - Space Dough Balls on Baking Sheet Place the sugar-coated dough balls on your prepared baking sheet. Leave about 2 inches between each ball. This space allows the cookies to spread while baking. - Baking Time and Temperature Bake the cookies in the preheated oven for 10-12 minutes. Look for light golden edges while the centers remain soft. This helps ensure a chewy cookie. - Pressing in Chocolate Kisses As soon as you take the baking sheet out, gently press a chocolate kiss into each cookie's center. You will see the cookies crack around the edges. This adds to their rustic charm. For the full recipe, check out the complete instructions above. - Overmixing the Dough Mixing too much can make the cookies tough. Mix just until the ingredients blend. - Incorrect Baking Time Baking too long can dry out the cookies. Watch closely for a light golden edge. - Temperature Control Make sure your ingredients are at room temperature. This helps the dough mix well and bake evenly. - The Right Consistency The dough should feel slightly sticky but still hold its shape. If it’s too dry, add a touch of milk. - Arranging Cookies for Display Use a decorative platter to show off your cookies. Place them in a circle or rows for a neat look. - Optional Decorative Sugars Sprinkle extra granulated sugar on top for some sparkle. You can also use colored sugars for fun themes. These tips can help you create the best Peanut Butter Blossoms. Enjoy baking, and remember to check the [Full Recipe] for all the details! {{image_4}} For those with nut allergies, making nut-free Peanut Butter Blossoms is easy. Substitute the peanut butter with sun butter or soy nut butter. Both options give a similar taste and texture. If you want to make these cookies vegan, use flax eggs instead of the large egg. Mix 1 tablespoon of ground flaxseed with 2.5 tablespoons of water. Let it sit for five minutes to thicken. This gives a nice binding effect without using eggs. Adding chocolate chips to the dough takes these cookies to a new level. Mix in a cup of semi-sweet or dark chocolate chips before rolling into balls. You can also try different nut butters. Almond butter or cashew butter adds a twist to the classic recipe. Each nut butter gives a unique flavor that can surprise your taste buds. Holiday-themed Peanut Butter Blossoms are always a hit. Use red and green sprinkles on top during Christmas. For fall, add a dash of cinnamon for a warm touch. You can also experiment with coconut. Mix in shredded coconut to the dough for a tropical flavor. These small changes can make your cookies stand out for any occasion. To keep your Peanut Butter Blossoms fresh, store them in airtight containers. This method helps maintain their soft texture and rich flavor. You can use plastic containers or glass jars with tight lids. Place a piece of parchment paper between layers if you stack them. This step prevents sticking and keeps them looking nice. Refrigeration can also extend their life. If you live in a warm area, it’s a good idea to refrigerate them. Just remember, cold cookies may become firmer. Let them sit at room temperature for a few minutes before enjoying again. Freezing is a great way to save your Peanut Butter Blossoms for later. To freeze, first let the cookies cool completely. Then, place them in a single layer on a baking sheet. Freeze for about an hour until firm. After that, transfer the cookies to a freezer-safe bag or container. Be sure to remove as much air as possible to avoid freezer burn. When you want to enjoy your frozen cookies, take out only what you need. Let them thaw at room temperature for about 30 minutes. This way, they regain their soft texture. You can also warm them in the oven for a few minutes for that fresh-baked taste. Peanut Butter Blossoms can stay fresh for about one week at room temperature. Keep them in an airtight container to avoid drying out. If you store them in the fridge, they may last up to two weeks. To know if your cookies have spoiled, check for any strange smells or a hard texture. Fresh cookies should feel soft and smell sweet. If they start to look dry or crumbly, it’s time to toss them out. Enjoying your cookies at their best keeps the fun alive! Peanut Butter Blossoms blend sweet and salty flavors. The soft cookie pairs well with a chocolate kiss on top. This combo makes them a favorite treat. They bring joy to every bite, thanks to their rustic look and rich taste. Yes, you can. Use gluten-free flour instead of all-purpose flour. This change keeps the cookie's texture similar. Just check the flour package for the right amount to use. Gluten-free Peanut Butter Blossoms will still taste great! To soften peanut butter, place the jar in a bowl of warm water. Let it sit for about 10 minutes. You can also microwave it for a few seconds. Stir well afterward. This makes it easier to mix into your dough. Yes, you can use other chocolates or candies. Try chocolate chips, caramel squares, or even peppermint patties. Each will change the flavor and look but keeps the cookie fun. Get creative with your favorite treats! You can use natural peanut butter. Just make sure it is smooth and well-mixed. Natural peanut butter may change the cookie's texture slightly. It can make them a bit denser but still delicious. You learned how to create delicious Peanut Butter Blossoms using simple ingredients. We covered each step, from mixing the dough to baking the cookies. Remember to avoid common mistakes for the best results. You can also explore fun variations and storage tips to keep your cookies fresh. Enjoy these treats at any time, and share them with friends and family. Your cookie-making skills will impress everyone, so get baking!](https://lushplate.com/wp-content/uploads/2025/06/00896cc6-e504-4743-a381-420cbd2b7f78.webp)
If you’re craving a sweet treat that blends rich peanut butter with creamy chocolate, you’re in the right place! In this blog post, I’ll share my delightful Peanut Butter Blossoms cookie recipe. With simple ingredients and easy steps, you’ll soon have a batch of these classic cookies ready to enjoy. Get ready to impress your family and friends with a dessert that’s as fun to make as it is to eat!
Ingredients
Here is the detailed list of ingredients you will need for Peanut Butter Blossoms:
– 1 cup creamy peanut butter
– 1 cup granulated sugar
– 1 cup packed light brown sugar
– 1 large egg
– 1 teaspoon pure vanilla extract
– 1 teaspoon baking soda
– ½ teaspoon fine salt
– 1 ½ cups all-purpose flour
– 36 unwrapped chocolate kisses
– Additional granulated sugar for rolling
Each ingredient plays a key role in making these cookies delightful. The creamy peanut butter gives them a rich, nutty taste. The granulated and brown sugars add sweetness and depth. The egg binds everything together while adding moisture. Pure vanilla extract brings in a warm, fragrant note. Baking soda helps create that lovely puffiness. Fine salt balances the sweetness, and all-purpose flour gives structure. Finally, the chocolate kisses provide a fun, melty surprise right in the middle of each cookie.
Make sure to gather everything before you start. This way, you can enjoy the process and not rush! For the full recipe, check the details above.
Step-by-Step Instructions
Preparation Steps
– Preheat Oven and Prepare Baking Sheet
Start by preheating your oven to 350°F (175°C). This helps the cookies bake evenly. Next, line a baking sheet with parchment paper. This prevents sticking and makes cleanup easier.
– Mix Peanut Butter and Sugars
In a large mixing bowl, add the creamy peanut butter, granulated sugar, and brown sugar. Use a hand mixer or wooden spoon to mix until creamy. You want a smooth and blended texture.
– Incorporate Egg and Other Ingredients
Crack a large egg into the bowl. Then add the pure vanilla extract, baking soda, and fine salt. Stir these into the mixture until fully combined. Your batter should look uniform and slightly thick.
Forming the Dough
– Gradually Add Flour
Slowly add the all-purpose flour to the bowl. Mix it in a little at a time. This will help form a soft dough. It should feel a bit sticky but still manageable.
– Roll Dough into Balls
Take small portions of the dough and roll them into 1-inch balls. Make sure they are uniform in size. After shaping, roll each ball in granulated sugar. This adds sweetness and texture.
Baking Cookies
– Space Dough Balls on Baking Sheet
Place the sugar-coated dough balls on your prepared baking sheet. Leave about 2 inches between each ball. This space allows the cookies to spread while baking.
– Baking Time and Temperature
Bake the cookies in the preheated oven for 10-12 minutes. Look for light golden edges while the centers remain soft. This helps ensure a chewy cookie.
– Pressing in Chocolate Kisses
As soon as you take the baking sheet out, gently press a chocolate kiss into each cookie’s center. You will see the cookies crack around the edges. This adds to their rustic charm.
For the full recipe, check out the complete instructions above.
Tips & Tricks
Common Mistakes to Avoid
– Overmixing the Dough
Mixing too much can make the cookies tough. Mix just until the ingredients blend.
– Incorrect Baking Time
Baking too long can dry out the cookies. Watch closely for a light golden edge.
Ensuring Perfect Cookies
– Temperature Control
Make sure your ingredients are at room temperature. This helps the dough mix well and bake evenly.
– The Right Consistency
The dough should feel slightly sticky but still hold its shape. If it’s too dry, add a touch of milk.
Presentation Tips
– Arranging Cookies for Display
Use a decorative platter to show off your cookies. Place them in a circle or rows for a neat look.
– Optional Decorative Sugars
Sprinkle extra granulated sugar on top for some sparkle. You can also use colored sugars for fun themes.
These tips can help you create the best Peanut Butter Blossoms. Enjoy baking, and remember to check the [Full Recipe] for all the details!
Variations
Alternative Ingredients
For those with nut allergies, making nut-free Peanut Butter Blossoms is easy. Substitute the peanut butter with sun butter or soy nut butter. Both options give a similar taste and texture. If you want to make these cookies vegan, use flax eggs instead of the large egg. Mix 1 tablespoon of ground flaxseed with 2.5 tablespoons of water. Let it sit for five minutes to thicken. This gives a nice binding effect without using eggs.
Flavor Twist Ideas
Adding chocolate chips to the dough takes these cookies to a new level. Mix in a cup of semi-sweet or dark chocolate chips before rolling into balls. You can also try different nut butters. Almond butter or cashew butter adds a twist to the classic recipe. Each nut butter gives a unique flavor that can surprise your taste buds.
Seasonal Variations
Holiday-themed Peanut Butter Blossoms are always a hit. Use red and green sprinkles on top during Christmas. For fall, add a dash of cinnamon for a warm touch. You can also experiment with coconut. Mix in shredded coconut to the dough for a tropical flavor. These small changes can make your cookies stand out for any occasion.
Storage Info
Proper Storage Techniques
To keep your Peanut Butter Blossoms fresh, store them in airtight containers. This method helps maintain their soft texture and rich flavor. You can use plastic containers or glass jars with tight lids. Place a piece of parchment paper between layers if you stack them. This step prevents sticking and keeps them looking nice.
Refrigeration can also extend their life. If you live in a warm area, it’s a good idea to refrigerate them. Just remember, cold cookies may become firmer. Let them sit at room temperature for a few minutes before enjoying again.
Freezing Cookies
Freezing is a great way to save your Peanut Butter Blossoms for later. To freeze, first let the cookies cool completely. Then, place them in a single layer on a baking sheet. Freeze for about an hour until firm. After that, transfer the cookies to a freezer-safe bag or container. Be sure to remove as much air as possible to avoid freezer burn.
When you want to enjoy your frozen cookies, take out only what you need. Let them thaw at room temperature for about 30 minutes. This way, they regain their soft texture. You can also warm them in the oven for a few minutes for that fresh-baked taste.
Shelf Life
Peanut Butter Blossoms can stay fresh for about one week at room temperature. Keep them in an airtight container to avoid drying out. If you store them in the fridge, they may last up to two weeks.
To know if your cookies have spoiled, check for any strange smells or a hard texture. Fresh cookies should feel soft and smell sweet. If they start to look dry or crumbly, it’s time to toss them out. Enjoying your cookies at their best keeps the fun alive!
FAQs
What makes Peanut Butter Blossoms unique?
Peanut Butter Blossoms blend sweet and salty flavors. The soft cookie pairs well with a chocolate kiss on top. This combo makes them a favorite treat. They bring joy to every bite, thanks to their rustic look and rich taste.
Can I make these cookies gluten-free?
Yes, you can. Use gluten-free flour instead of all-purpose flour. This change keeps the cookie’s texture similar. Just check the flour package for the right amount to use. Gluten-free Peanut Butter Blossoms will still taste great!
How can I soften peanut butter quickly?
To soften peanut butter, place the jar in a bowl of warm water. Let it sit for about 10 minutes. You can also microwave it for a few seconds. Stir well afterward. This makes it easier to mix into your dough.
Are there any suitable substitutions for the chocolate kiss?
Yes, you can use other chocolates or candies. Try chocolate chips, caramel squares, or even peppermint patties. Each will change the flavor and look but keeps the cookie fun. Get creative with your favorite treats!
Can I use natural peanut butter instead of creamy?
You can use natural peanut butter. Just make sure it is smooth and well-mixed. Natural peanut butter may change the cookie’s texture slightly. It can make them a bit denser but still delicious.
You learned how to create delicious Peanut Butter Blossoms using simple ingredients. We covered each step, from mixing the dough to baking the cookies. Remember to avoid common mistakes for the best results. You can also explore fun variations and storage tips to keep your cookies fresh. Enjoy these treats at any time, and share them with friends and family. Your cookie-making skills will impress everyone, so get baking!
![Here is the detailed list of ingredients you will need for Peanut Butter Blossoms: - 1 cup creamy peanut butter - 1 cup granulated sugar - 1 cup packed light brown sugar - 1 large egg - 1 teaspoon pure vanilla extract - 1 teaspoon baking soda - ½ teaspoon fine salt - 1 ½ cups all-purpose flour - 36 unwrapped chocolate kisses - Additional granulated sugar for rolling Each ingredient plays a key role in making these cookies delightful. The creamy peanut butter gives them a rich, nutty taste. The granulated and brown sugars add sweetness and depth. The egg binds everything together while adding moisture. Pure vanilla extract brings in a warm, fragrant note. Baking soda helps create that lovely puffiness. Fine salt balances the sweetness, and all-purpose flour gives structure. Finally, the chocolate kisses provide a fun, melty surprise right in the middle of each cookie. Make sure to gather everything before you start. This way, you can enjoy the process and not rush! For the full recipe, check the details above. - Preheat Oven and Prepare Baking Sheet Start by preheating your oven to 350°F (175°C). This helps the cookies bake evenly. Next, line a baking sheet with parchment paper. This prevents sticking and makes cleanup easier. - Mix Peanut Butter and Sugars In a large mixing bowl, add the creamy peanut butter, granulated sugar, and brown sugar. Use a hand mixer or wooden spoon to mix until creamy. You want a smooth and blended texture. - Incorporate Egg and Other Ingredients Crack a large egg into the bowl. Then add the pure vanilla extract, baking soda, and fine salt. Stir these into the mixture until fully combined. Your batter should look uniform and slightly thick. - Gradually Add Flour Slowly add the all-purpose flour to the bowl. Mix it in a little at a time. This will help form a soft dough. It should feel a bit sticky but still manageable. - Roll Dough into Balls Take small portions of the dough and roll them into 1-inch balls. Make sure they are uniform in size. After shaping, roll each ball in granulated sugar. This adds sweetness and texture. - Space Dough Balls on Baking Sheet Place the sugar-coated dough balls on your prepared baking sheet. Leave about 2 inches between each ball. This space allows the cookies to spread while baking. - Baking Time and Temperature Bake the cookies in the preheated oven for 10-12 minutes. Look for light golden edges while the centers remain soft. This helps ensure a chewy cookie. - Pressing in Chocolate Kisses As soon as you take the baking sheet out, gently press a chocolate kiss into each cookie's center. You will see the cookies crack around the edges. This adds to their rustic charm. For the full recipe, check out the complete instructions above. - Overmixing the Dough Mixing too much can make the cookies tough. Mix just until the ingredients blend. - Incorrect Baking Time Baking too long can dry out the cookies. Watch closely for a light golden edge. - Temperature Control Make sure your ingredients are at room temperature. This helps the dough mix well and bake evenly. - The Right Consistency The dough should feel slightly sticky but still hold its shape. If it’s too dry, add a touch of milk. - Arranging Cookies for Display Use a decorative platter to show off your cookies. Place them in a circle or rows for a neat look. - Optional Decorative Sugars Sprinkle extra granulated sugar on top for some sparkle. You can also use colored sugars for fun themes. These tips can help you create the best Peanut Butter Blossoms. Enjoy baking, and remember to check the [Full Recipe] for all the details! {{image_4}} For those with nut allergies, making nut-free Peanut Butter Blossoms is easy. Substitute the peanut butter with sun butter or soy nut butter. Both options give a similar taste and texture. If you want to make these cookies vegan, use flax eggs instead of the large egg. Mix 1 tablespoon of ground flaxseed with 2.5 tablespoons of water. Let it sit for five minutes to thicken. This gives a nice binding effect without using eggs. Adding chocolate chips to the dough takes these cookies to a new level. Mix in a cup of semi-sweet or dark chocolate chips before rolling into balls. You can also try different nut butters. Almond butter or cashew butter adds a twist to the classic recipe. Each nut butter gives a unique flavor that can surprise your taste buds. Holiday-themed Peanut Butter Blossoms are always a hit. Use red and green sprinkles on top during Christmas. For fall, add a dash of cinnamon for a warm touch. You can also experiment with coconut. Mix in shredded coconut to the dough for a tropical flavor. These small changes can make your cookies stand out for any occasion. To keep your Peanut Butter Blossoms fresh, store them in airtight containers. This method helps maintain their soft texture and rich flavor. You can use plastic containers or glass jars with tight lids. Place a piece of parchment paper between layers if you stack them. This step prevents sticking and keeps them looking nice. Refrigeration can also extend their life. If you live in a warm area, it’s a good idea to refrigerate them. Just remember, cold cookies may become firmer. Let them sit at room temperature for a few minutes before enjoying again. Freezing is a great way to save your Peanut Butter Blossoms for later. To freeze, first let the cookies cool completely. Then, place them in a single layer on a baking sheet. Freeze for about an hour until firm. After that, transfer the cookies to a freezer-safe bag or container. Be sure to remove as much air as possible to avoid freezer burn. When you want to enjoy your frozen cookies, take out only what you need. Let them thaw at room temperature for about 30 minutes. This way, they regain their soft texture. You can also warm them in the oven for a few minutes for that fresh-baked taste. Peanut Butter Blossoms can stay fresh for about one week at room temperature. Keep them in an airtight container to avoid drying out. If you store them in the fridge, they may last up to two weeks. To know if your cookies have spoiled, check for any strange smells or a hard texture. Fresh cookies should feel soft and smell sweet. If they start to look dry or crumbly, it’s time to toss them out. Enjoying your cookies at their best keeps the fun alive! Peanut Butter Blossoms blend sweet and salty flavors. The soft cookie pairs well with a chocolate kiss on top. This combo makes them a favorite treat. They bring joy to every bite, thanks to their rustic look and rich taste. Yes, you can. Use gluten-free flour instead of all-purpose flour. This change keeps the cookie's texture similar. Just check the flour package for the right amount to use. Gluten-free Peanut Butter Blossoms will still taste great! To soften peanut butter, place the jar in a bowl of warm water. Let it sit for about 10 minutes. You can also microwave it for a few seconds. Stir well afterward. This makes it easier to mix into your dough. Yes, you can use other chocolates or candies. Try chocolate chips, caramel squares, or even peppermint patties. Each will change the flavor and look but keeps the cookie fun. Get creative with your favorite treats! You can use natural peanut butter. Just make sure it is smooth and well-mixed. Natural peanut butter may change the cookie's texture slightly. It can make them a bit denser but still delicious. You learned how to create delicious Peanut Butter Blossoms using simple ingredients. We covered each step, from mixing the dough to baking the cookies. Remember to avoid common mistakes for the best results. You can also explore fun variations and storage tips to keep your cookies fresh. Enjoy these treats at any time, and share them with friends and family. Your cookie-making skills will impress everyone, so get baking!](https://lushplate.com/wp-content/uploads/2025/06/00896cc6-e504-4743-a381-420cbd2b7f78-300x300.webp)
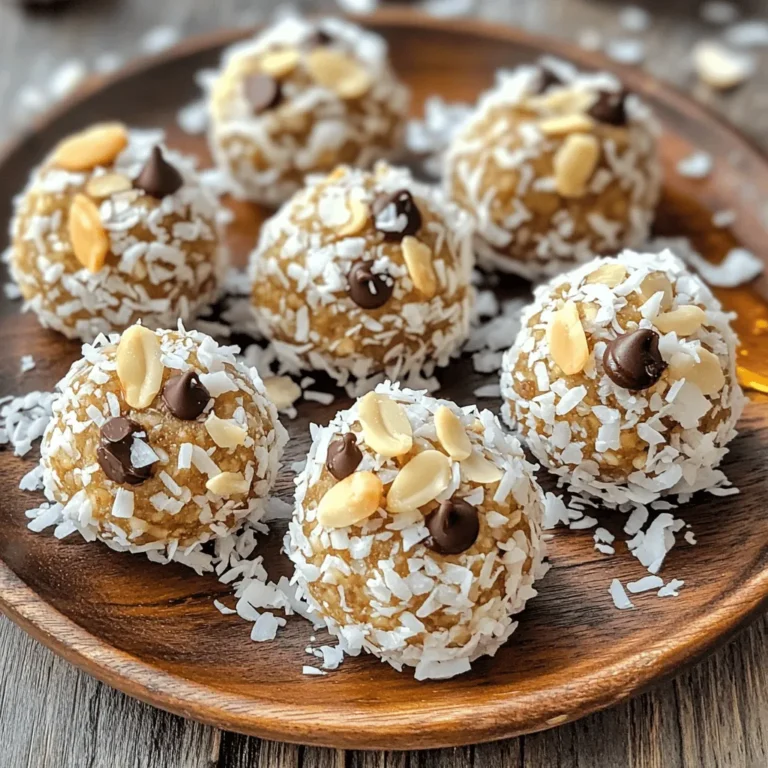
![To make Peanut Butter Energy Bites, you need just a few simple items. Here’s what you’ll need: - 1 cup rolled oats - ½ cup natural peanut butter - ¼ cup honey or pure maple syrup - ¼ cup mini chocolate chips - ¼ cup chopped nuts (choose almonds, walnuts, or pecans) - 2 tablespoons chia seeds - 1 teaspoon pure vanilla extract - A pinch of salt These ingredients blend well together. The oats give a hearty base. The peanut butter adds creaminess and protein. Honey or maple syrup sweetens the mix naturally. Chocolate chips bring a delightful treat. Nuts add crunch, while chia seeds pack in omega-3s. You can also play with flavors by adding extra ingredients. Here are some fun options: - Dried fruits like cranberries or raisins - Coconut flakes for sweetness - Cinnamon for a warm spice - Protein powder for an extra boost These add-ins let you customize each bite. Try mixing and matching to find your favorite combo! Each ingredient offers great health perks: - Rolled oats: Full of fiber, they help keep you full. - Natural peanut butter: Provides healthy fats and protein, great for energy. - Honey or maple syrup: Natural sweeteners that give quick energy. - Mini chocolate chips: Satisfy sweet cravings with some antioxidants. - Chopped nuts: Offer healthy fats and can support heart health. - Chia seeds: High in fiber and omega-3, they aid digestion. - Vanilla extract: Adds flavor without extra calories. - Salt: A pinch enhances flavor and balance. These benefits make these energy bites a smart snack choice. Enjoy them as part of a balanced diet! To start, gather all your ingredients. You will need rolled oats, peanut butter, honey, chocolate chips, nuts, chia seeds, vanilla, and salt. First, in a large bowl, mix the rolled oats and peanut butter. Next, pour in the honey or maple syrup. Add the vanilla extract. Use a spatula to combine these well. You want a sticky mix that holds together. Now, add the mini chocolate chips, chopped nuts, chia seeds, and a pinch of salt. Stir until everything is mixed evenly. Each bite needs to have all the flavors. This step is key for a yummy snack. When mixing, ensure the peanut butter is creamy. This helps the ingredients blend. If the mix feels too dry, add a little more honey. If it's too sticky, just wet your hands a bit. This will help when you start rolling the bites. Mixing well is crucial. You want to ensure that each ingredient is spread out. This way, every bite is equally delicious. Take your time and enjoy the process. Now it’s time to roll the bites. Take a small amount of the mixture, about one tablespoon. Use your hands to form a ball about one inch wide. If the mixture sticks too much, dampen your hands with water. This makes rolling easier. Place the rolled bites on a baking sheet lined with parchment paper. Keep some space between each one. After rolling, chill them in the fridge for about 30 minutes. This helps them set and stay round. Enjoy your homemade energy bites! For the full recipe, check out Nutty Bliss Peanut Butter Energy Bites. One common mistake is not measuring ingredients correctly. Too much liquid can make your bites soggy. Too little can make them dry. Always use measuring cups for accuracy. Another mistake is skipping the chilling step. This helps the bites hold their shape better. Lastly, don’t skip the salt. It enhances all the flavors in your energy bites. For the best texture, mix your ingredients well. You want everything to blend together. If the mixture feels too dry, add a little more honey or peanut butter. If it’s too wet, add a few more oats. This balance makes for a firm yet chewy bite. Using fresh ingredients also helps improve texture and flavor. Use high-quality peanut butter. Natural peanut butter has a rich taste and smooth texture. Choose oats that are rolled, not instant. They give the bites a great chew. When adding nuts or chocolate, pick your favorites. This personal touch makes the recipe yours. Finally, store your energy bites in an airtight container. This keeps them fresh for when you need a quick snack. For the full recipe, check out the [Full Recipe]. {{image_4}} You can mix flavors in your energy bites for fun. Try using almond butter instead of peanut butter. This gives a new taste. You can also add a splash of maple syrup for a sweet kick. For a chocolate twist, use cocoa powder or chocolate protein powder. A little cinnamon can add warmth and spice too. The key is to experiment and find what you love! Making these energy bites fit your diet is easy. If you need gluten-free bites, just use certified gluten-free oats. For a vegan option, swap honey for maple syrup. You can also use a plant-based protein powder if you want that boost. Always check ingredient labels to ensure they meet your dietary needs. This way, everyone can enjoy these tasty snacks! Want to jazz up your energy bites? Add shredded coconut for a tropical vibe. It gives a nice chew and flavor. Dried fruits like cranberries or apricots also work well. They add sweetness and a fruity burst. You can even toss in some seeds, like pumpkin or sunflower seeds, for extra crunch. The options are endless, so get creative and make them your own! For the full recipe, check out Nutty Bliss Peanut Butter Energy Bites. Enjoy your delicious, healthy snacks! Store your peanut butter energy bites in an airtight container. This keeps them fresh and tasty. You can use glass or plastic containers. Make sure they are sealed well to prevent air from getting in. It helps to place a piece of parchment paper between layers, so they don’t stick together. These energy bites stay fresh in the fridge for up to a week. If you want them to last longer, consider freezing them. They taste great even after being frozen. Just pull a few out when you need a snack. To freeze, first, place the energy bites in a single layer on a baking sheet. Freeze them for about an hour, or until firm. Then, transfer them to a freezer-safe bag or container. Label the bag with the date. They can last in the freezer for up to three months. When you want to enjoy them, let them thaw in the fridge or at room temperature. This way, you always have a healthy snack ready to go! You can replace honey with pure maple syrup. The bites will still taste sweet. You can also try mashed banana or applesauce for a different flavor. Just ensure the texture remains thick enough to hold together. Yes, you can use almond butter, cashew butter, or sunflower seed butter. Each will give a unique taste. Just make sure the nut butter is creamy and smooth for best results. These energy bites are great as a snack anytime. You can eat them before or after a workout. They also work well as a quick breakfast on the go. Enjoy them straight from the fridge for a cool treat. For the full recipe, check out Nutty Bliss Peanut Butter Energy Bites. Peanut butter energy bites are easy to make and tasty. We covered the key ingredients, helpful tips, and fun variations. You learned how to avoid common mistakes and store these bites for freshness. These snacks fit many diets and are simple to customize. With the right steps, you can make delicious energy bites that boost your day. Enjoy making them, and feel free to get creative!](https://lushplate.com/wp-content/uploads/2025/06/59165714-66e7-471b-bb5c-384e550462a4-768x768.webp)
. - Rinse jasmine rice under cold running water. This step removes extra starch. It helps create fluffy rice. - Combine rice, coconut milk, water, and salt in a saucepan. Mix gently to combine. - Bring to a boil over medium heat. Watch closely to prevent overflow. - Reduce to a simmer, cover, and cook for 15 minutes. The rice should absorb all the liquid. - Peel and dice the ripe mango. Make sure the pieces are even and small. - Toss with lime juice and optional sweetener in a separate bowl. This will enhance the mango's flavor. - Fluff the cooked rice and fold in shredded coconut. This adds a nice texture. - Serve rice topped with lime-infused mango and mint garnish. The colors will make the dish pop. For a full recipe, check [Full Recipe]. Enjoy this tropical delight! To make perfect coconut rice, start by rinsing the jasmine rice. Rinsing removes excess starch. This step is the key to fluffy rice. After cooking, let the rice rest for five minutes. This resting time improves the texture. Consider adding sweeteners like maple syrup or honey. These add a nice touch of sweetness. Using fresh lime juice is also important. Fresh juice has a brighter flavor than bottled juice. It enhances the mango and coconut taste. For an eye-catching dish, serve the rice in hollowed-out mango halves. This gives a fun and tropical look. You can also pair it with other tropical fruits. Use vibrant fruits like kiwi or pineapple to add color and flair. {{image_4}} You can mix coconut rice with many fruits. Pineapple adds a tangy twist, while kiwi brings a fun color and taste. Try seasonal fruits too. In summer, peaches or berries are great. In winter, opt for citrus fruits like oranges or grapefruit. Each fruit adds its unique flavor, making the dish exciting. If you want dairy-free options, use non-dairy milk instead of coconut milk. Almond or oat milk works well. For low-sugar options, swap maple syrup or honey with a sugar substitute, like stevia or agave syrup. This way, everyone can enjoy this tropical delight without worry. To enhance the flavor, try adding spices. A pinch of cardamom or cinnamon brings warmth to the dish. You can also infuse the coconut milk with flavors like vanilla or pandan. These additions create a more complex taste, making your coconut rice stand out. Feel free to explore these variations to personalize your coconut rice with mango. Each choice makes the dish more fun and tasty. For the complete recipe, check out the [Full Recipe]. To keep your coconut rice and mango fresh, use airtight containers. Glass or plastic containers work well. Store the rice and mango separately to avoid sogginess. When stored properly, coconut rice lasts about 3 to 5 days in the fridge. Mango can stay fresh for 2 to 3 days. Always check for any signs of spoilage before eating. You can freeze cooked coconut rice for later use. Allow the rice to cool completely. Then, portion it into freezer-safe bags. Remove as much air as possible before sealing. Frozen coconut rice lasts about 2 to 3 months. For thawing, place the rice in the fridge overnight. Reheat it gently in the microwave or on the stovetop. If you have leftover mango, get creative! Add it to smoothies, yogurt, or salads. You can also blend it into sauces. For leftover coconut rice, consider making rice cakes or fritters. You can stir it into soups or use it in stir-fries. These ideas help reduce waste while adding variety to your meals. For more details on the recipe, check the Full Recipe. The best rice for coconut rice is jasmine rice. Its fragrant aroma and soft texture make it ideal. Basmati rice can work, too, but it gives a different flavor. Jasmine rice absorbs the coconut milk well, creating a creamy dish. You can also try short-grain rice for a stickier texture. Yes, you can use coconut cream instead of coconut milk. Coconut cream is richer and adds a strong coconut flavor. To make it less thick, mix it with water. This way, you still get that creamy texture without it being too heavy. Adjust the amount of water to your taste. Making this recipe vegan is simple. Use all plant-based ingredients. Coconut milk is already vegan. Ensure your sweetener, like maple syrup, is also vegan. Avoid honey if you want a strict vegan dish. The mango and mint add freshness and flavor without any animal products. Absolutely! Coconut rice pairs well with many savory dishes. Try it with grilled chicken or shrimp for a tropical twist. It also complements spicy curries nicely. For a vegetarian option, serve it with stir-fried vegetables or tofu. The mild flavor of coconut rice enhances any main dish you choose. This recipe for coconut rice with mango is simple and tasty. You start by cooking jasmine rice in coconut milk, which gives it a rich flavor. Adding ripe mango brings a fresh and sweet taste. Remember the tips for fluffy rice and fun presentations. Try using different fruits or spices to make it your own. Store leftovers well for easy meals later. This dish is not just a treat; it’s a way to explore flavors. Enjoy every bite and let your creativity shine in the kitchen!](https://lushplate.com/wp-content/uploads/2025/05/48989e7e-794b-4d92-bbb5-9c568bcb4256-768x768.webp)